With your document open go to the "Apple Menu" > "File" > and select "Print Booklet…"

This will prompt the "Print Booklet" window pane to open. First thing you want to do is to make sure that the "Booklet Type" is set to "2-up Saddle Stitch". Once you have made/verified that selection click on "Print Settings" located at the bottom of the window.

This action will open the "Print" window pane where we will be changing a few of the settings. First select "Postscript File" from the "Printer" pull down menu. Next change the "PPD" to "Generic Postscript Printer" (you will see in the image below, I did not have that option so I had to choose my large format printer—EPSON Stylus Photo 1400—to change the necessary settings).


Next click on "Setup" in the left-hand menu list. This will change the information in the right-hand side of the window, where we will make a few more changes.
In "Setup", we want to make sure that the "Paper Size" is set to either "US Letter (8.5 x 11in)". Next we want to change the "Page Position" from its default to "Centered".

Now we move onto "Marks and Bleed" in the left-hand menu. Again this will change the information shown on the right-hand side of the window.
Under "Marks" you want to check "Crop Marks", "Registration Marks", and "Page Information". Under "Bleed and Slug" you want to check "Use Document Bleed Settings".

Once all these Settings have been changed, click "OK". Once "OK" is clicked InDesign will bring you back to the "Print" window pane. Once at this window, we want to click "Preview" to make sure that our page layout looks correct.

If everything looks okay, click "Print". If something looks out-of-place, double check your "Print Settings…".
Once you click "Print" InDesign will ask you to save your file. It may be best to save this file in your previously packaged folder for best organization. (If your file name has a .indd.ps at the end, remove the .indd)

Save and close your InDesign File.
Next Step
Go into your "Dock" and open "Adobe Acrobat Pro". It's the red and white icon on the far right in the picture below.

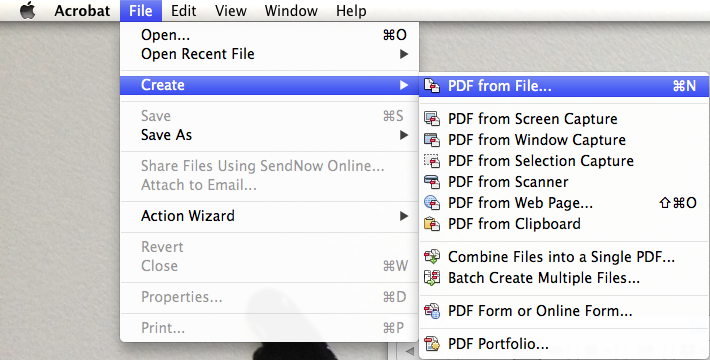
Once Acrobat opens go to the "Apple Menu" > "File" > "Create" > and select "PDF from file…"
This action will prompt the "Open" window pane. In the "Show" pull down menu select "Postscript/EPS" and click on "Settings".


This will open a smaller window named "Adobe PDF Settings". In this window make sure that the "Adobe PDF Settings" pull down menu is set to "High Quality Print". Click "OK".

In the "Open" window, locate your ".ps" file and click "Open".

This will create and then open your PDF in Acrobat.
Remember to Save this PDF into your Packaged Folder and to take a Paper Dummy with you to where you take your brochure to print to show them an example. Do not pay until they print it correctly.


